Repairing the Rust - Bulkhead
With all the corroded and damaged areas on the front end identified, it was time to start chopping out the rust and
welding in some nice new metal!
The first job I tackled was repairing the cracks by the lower bulkhead front subframe mounts and fitting some reinforcing plates to prevent that happening again.
With the rust all wire brushed off the inside, I gave it all a couple of coats of Bilt Hamber Etchweld to protect the metal that would be trapped between the reinforcing plates and the bulkhead once they were welded in place and therefore unable to get painted. It's great stuff, and very highly recommended - I've used a lot of Bilt- Hamber stuff, and never been anything other than very impressed with it. I then measured up the area for the plates, and started cutting steel! (I'd been looking forward to this part for wuite some time). The plates go right into the seam between the bulkhead and floorpan (as did the original plates) and I notched the plates to fit in around the hollows where the steering rack mounts bolt on to allow me to get the biggest plates possible in (see below) - the bigger the plates, the more they'll spread the load, and the less likely a repeat of the cracking...
 With the plate measured and trimmed to fit, I marked round the edge and then removed the plate. Next job was to
pre-drill the holes in the bulkhead for the
plug welds
that would hold the centre of the plate to the bulkhead in addition to the seam welds to go round the edges. I just
drew up a grid inside the markings of 35mm spacing, to give me points 35mm apart in a rectangular grid, which I
then drilled out with an 8mm drill. With that done I needed to clamp the reinfocing plate to the bulkhead in order
to get as much metal-metal contact as possible and give the strongest weld -
With the plate measured and trimmed to fit, I marked round the edge and then removed the plate. Next job was to
pre-drill the holes in the bulkhead for the
plug welds
that would hold the centre of the plate to the bulkhead in addition to the seam welds to go round the edges. I just
drew up a grid inside the markings of 35mm spacing, to give me points 35mm apart in a rectangular grid, which I
then drilled out with an 8mm drill. With that done I needed to clamp the reinfocing plate to the bulkhead in order
to get as much metal-metal contact as possible and give the strongest weld -
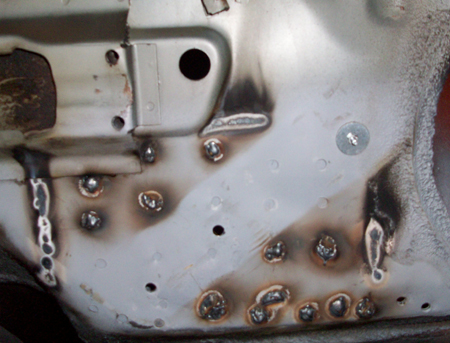 given that I could not get a clamp around it, the solution I came up with was to mark the reinforing plates with
the locations of the subframe mounting bolt holes, drill those out with an 8mm drill, replace the plates in
position and use some 8mm High Tensile bolts through a piece of 18mm ply on the inside and a section of wooden
plank on the outside to crank the plate and bulkhead together as tightly as possible - you can see from the photo
of the nearside bulkhead on the right (taken after I'd put in all the plug and seam welds around the plank and ply)
where the this worked pretty well, but you can see on the photo of the nearside plate on the left that there was a
spot furthest from the bolt holes where the metal was sitting a bit pround, so I drilled a 4mm hole and used a 4mm
bolt and some penny washers (as you can see in both photos) to clamp that up prior to finishing the plug welds and
welding the seam round the edges there. Possibly not the most elegant solution, but it was definitely effective.
given that I could not get a clamp around it, the solution I came up with was to mark the reinforing plates with
the locations of the subframe mounting bolt holes, drill those out with an 8mm drill, replace the plates in
position and use some 8mm High Tensile bolts through a piece of 18mm ply on the inside and a section of wooden
plank on the outside to crank the plate and bulkhead together as tightly as possible - you can see from the photo
of the nearside bulkhead on the right (taken after I'd put in all the plug and seam welds around the plank and ply)
where the this worked pretty well, but you can see on the photo of the nearside plate on the left that there was a
spot furthest from the bolt holes where the metal was sitting a bit pround, so I drilled a 4mm hole and used a 4mm
bolt and some penny washers (as you can see in both photos) to clamp that up prior to finishing the plug welds and
welding the seam round the edges there. Possibly not the most elegant solution, but it was definitely effective.
As you can see from the photos, my welding still needs some practice, but it is improving - the plug welds are definitely getting neater, I just need to start laying down less weld, as it takes a fair amount of time grinding it all back :-).
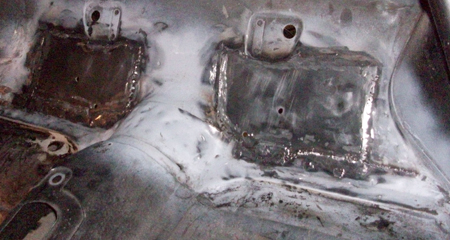
Finalising these plates was just finishing off the remaining spot welds, ensuring that the cracks were totally welded up and then completing the seam welds around the plates (left). With this all done, I ground back the welds as flush as I could get them (right)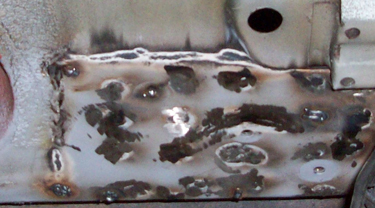 without risking thinning out the body panels (thus weakeneing the area around the weld, so best avoided). You can
see on the picture on the right where I've welded up the crack above the offside subframe mounts, and made a start
on grinding back the welds to get a good surface ready for primer.
without risking thinning out the body panels (thus weakeneing the area around the weld, so best avoided). You can
see on the picture on the right where I've welded up the crack above the offside subframe mounts, and made a start
on grinding back the welds to get a good surface ready for primer.
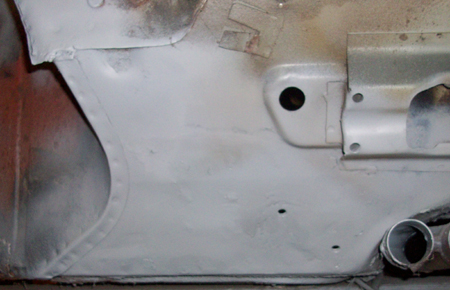
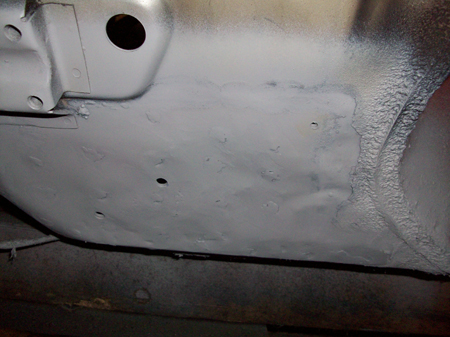
With the cracks welded up, the reinforcing plates welded in place and the welds ground flush I then applied a couple of quick coats of Etchweld (see pictures below) to keep the rust at bay until I'm ready to paint up the whole front end with some POR-15 extra durable paint, which should keep the front end free of rust for the next 20 years :-). The rippled surface on the outer edge on the nearside bulkhead is just some remaining stonechip, which I left in place until I was ready to remove in nearside inner wing - at this stage there was still some stoneship and old pain on parts of the bulkhead I hadn't touched - I didn't see any point in removing it until it was time for the final paint.
The first job I tackled was repairing the cracks by the lower bulkhead front subframe mounts and fitting some reinforcing plates to prevent that happening again.
With the rust all wire brushed off the inside, I gave it all a couple of coats of Bilt Hamber Etchweld to protect the metal that would be trapped between the reinforcing plates and the bulkhead once they were welded in place and therefore unable to get painted. It's great stuff, and very highly recommended - I've used a lot of Bilt- Hamber stuff, and never been anything other than very impressed with it. I then measured up the area for the plates, and started cutting steel! (I'd been looking forward to this part for wuite some time). The plates go right into the seam between the bulkhead and floorpan (as did the original plates) and I notched the plates to fit in around the hollows where the steering rack mounts bolt on to allow me to get the biggest plates possible in (see below) - the bigger the plates, the more they'll spread the load, and the less likely a repeat of the cracking...
With the plate measured and trimmed to fit, I marked round the edge and then removed the plate. Next job was to
pre-drill the holes in the bulkhead for the
plug welds
that would hold the centre of the plate to the bulkhead in addition to the seam welds to go round the edges. I just
drew up a grid inside the markings of 35mm spacing, to give me points 35mm apart in a rectangular grid, which I
then drilled out with an 8mm drill. With that done I needed to clamp the reinfocing plate to the bulkhead in order
to get as much metal-metal contact as possible and give the strongest weld -
given that I could not get a clamp around it, the solution I came up with was to mark the reinforing plates with
the locations of the subframe mounting bolt holes, drill those out with an 8mm drill, replace the plates in
position and use some 8mm High Tensile bolts through a piece of 18mm ply on the inside and a section of wooden
plank on the outside to crank the plate and bulkhead together as tightly as possible - you can see from the photo
of the nearside bulkhead on the right (taken after I'd put in all the plug and seam welds around the plank and ply)
where the this worked pretty well, but you can see on the photo of the nearside plate on the left that there was a
spot furthest from the bolt holes where the metal was sitting a bit pround, so I drilled a 4mm hole and used a 4mm
bolt and some penny washers (as you can see in both photos) to clamp that up prior to finishing the plug welds and
welding the seam round the edges there. Possibly not the most elegant solution, but it was definitely effective.
As you can see from the photos, my welding still needs some practice, but it is improving - the plug welds are definitely getting neater, I just need to start laying down less weld, as it takes a fair amount of time grinding it all back :-).
Finalising these plates was just finishing off the remaining spot welds, ensuring that the cracks were totally welded up and then completing the seam welds around the plates (left). With this all done, I ground back the welds as flush as I could get them (right)
without risking thinning out the body panels (thus weakeneing the area around the weld, so best avoided). You can
see on the picture on the right where I've welded up the crack above the offside subframe mounts, and made a start
on grinding back the welds to get a good surface ready for primer.With the cracks welded up, the reinforcing plates welded in place and the welds ground flush I then applied a couple of quick coats of Etchweld (see pictures below) to keep the rust at bay until I'm ready to paint up the whole front end with some POR-15 extra durable paint, which should keep the front end free of rust for the next 20 years :-). The rippled surface on the outer edge on the nearside bulkhead is just some remaining stonechip, which I left in place until I was ready to remove in nearside inner wing - at this stage there was still some stoneship and old pain on parts of the bulkhead I hadn't touched - I didn't see any point in removing it until it was time for the final paint.