Corrosion on the Offside
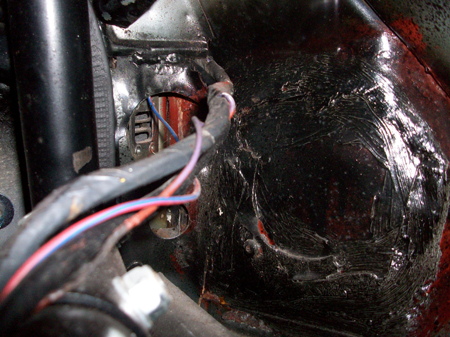
Other than the nasty corrosion behind the damper mounts, the ninner wings appear to be are pretty clear -
during the last restoration (when I paid someone else to do all the welding) there was some rust around the fresh
air vents in the top of the inner wings - the solution was to cut out the rust and then just plate over the vent
holes rather than put in new vent hole sections to keep the cost down. The whole section was then covered in a load
of stonechip type substance, which has kept the corrosion at bay, but I wanted to clean it off and have a look
behind - partially because I want to make sure I cover absolutely everything I can and partially because I
discoverd that the area behind the dash where the top fresh air vents used to be looks to have a some of the old
corroded metal simply plated over rather than the corrosion being removed - see the photos of the below - Nearside
on the left, Offside on the right.
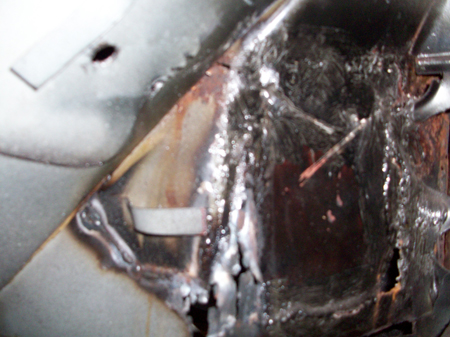
The presence of an old rivet that held the fresh air hose in place amongst the jagged metal (bottom left of the left hand picture) and the upainted weld burn on the right hand picture (the holes in the right hand picture were made by my grinding the weld bead on the other side) does not imply that there was a greal deal of care taken over the work!
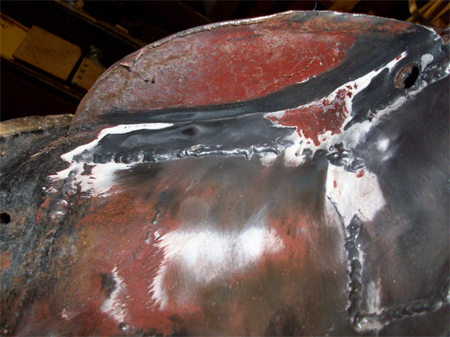
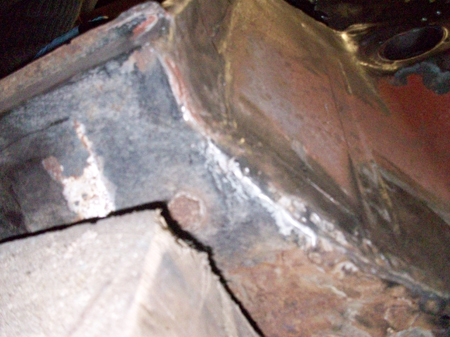
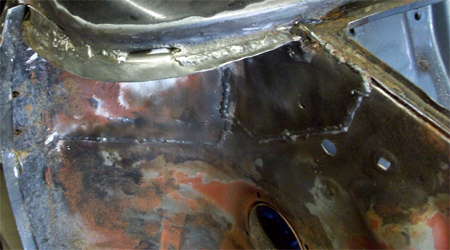 Another outing for the grinder mounted wire brush and the two plates that were put in around the air vent on the
offside can be seen, which look OK from the outside, but from the aove I was concerned that there might be hidden
rust plated over, given that the engine bay side of the wings didn't show any signs of the plates. Also, looking at
the bottom edge of the scuttle panel (closeup, right) it was clear that the plates had not been put in quite as
carefully as they should (witness the 4mm gap - I haven't ground that out, just used a wire brush to take the seam
sealer etc off)!
Another outing for the grinder mounted wire brush and the two plates that were put in around the air vent on the
offside can be seen, which look OK from the outside, but from the aove I was concerned that there might be hidden
rust plated over, given that the engine bay side of the wings didn't show any signs of the plates. Also, looking at
the bottom edge of the scuttle panel (closeup, right) it was clear that the plates had not been put in quite as
carefully as they should (witness the 4mm gap - I haven't ground that out, just used a wire brush to take the seam
sealer etc off)!
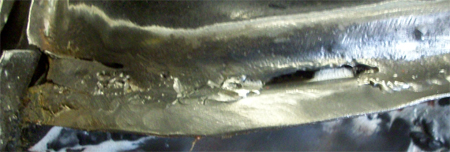 You can see on the A panel edge (left hand side of the photo) that the scuttle does not meet this new plate (called
either the 'Scuttle Closing plate' or 'Gusset plate -
Mini Spares part #14A8348
') and it looks like a patch section was (half-heartedly) put in at the A panel end to join the two together.
You can see on the A panel edge (left hand side of the photo) that the scuttle does not meet this new plate (called
either the 'Scuttle Closing plate' or 'Gusset plate -
Mini Spares part #14A8348
') and it looks like a patch section was (half-heartedly) put in at the A panel end to join the two together.
Now as this looks like a great water/rust/general crud trap, I figured I'd better grind out the weld and have a look behind.
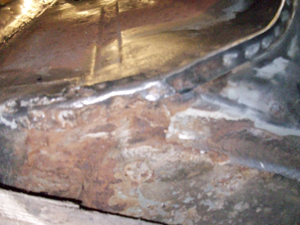
This was easier said than done (isn't it always?), as you can see from the picture left (underside of the offside scuttle from the inner wing area) it has been seam welded to the new plates (as it should have been), but in an area it's not easy to get a grinder in without going right through into whatever is behind the plates...
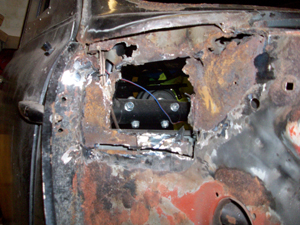
If you're wondering what the 13mm hole in the inner wing under the scuttle is for (top right had side of the picture, it's the rear mount for the hinge used in my somewhat overly complicated flip-front system, which won't be getting re-fitted - with a few more years, a lot more experience (and many more pies) under my belt I have a much better solution in mind - see here.
 A quick buzz with a cutting disc in the grinder against the join, and the plate was free of the scuttle, but
getting the other two plates free was considerably more difficult, and involved a lot of careful grinding to avoid
any unnecessary damage to surrounding metal. Once the plates were removed I was greeted with the delightful view on
the right.
A quick buzz with a cutting disc in the grinder against the join, and the plate was free of the scuttle, but
getting the other two plates free was considerably more difficult, and involved a lot of careful grinding to avoid
any unnecessary damage to surrounding metal. Once the plates were removed I was greeted with the delightful view on
the right.
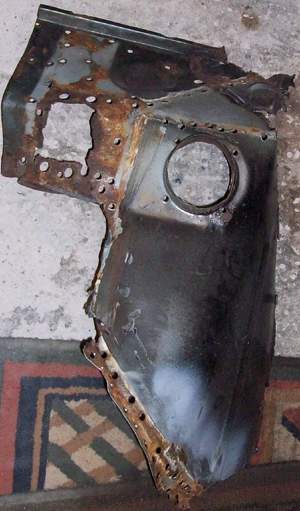
 When I cut through the weld holding the Scuttle Closing plate in place and dropped it out, I was very surprised to
see that it had some extra bits of sheet steel welded on to it (left).
When I cut through the weld holding the Scuttle Closing plate in place and dropped it out, I was very surprised to
see that it had some extra bits of sheet steel welded on to it (left).
My Original plan was to cut out the rusted metal and make up some replacement panels out of steel sheet, but as the rust looked more extensive than I had first thought, I decided to remove the A Panel to enable me to get a better look at the bulkhead area. (A decision made easier by the fact that the A panel was only tacked on by a weld top and bottom and three tacks on the door side!).
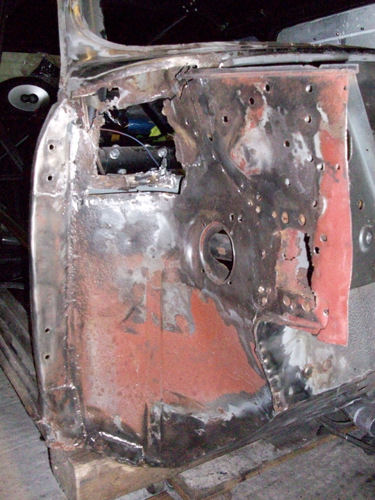 With the A panel removed I could get the wire bush in much more easily, and cleaned it up to reveal the extent of
the corrosion (see right) - the inner bulkhead has had a few repair panels, and the metal behind the plates was in a
terrible state, lots of corroded metal still in place, rotting the new plates from the inside out! The state of
the metal under the scuttle was also very concerning and there was some surface pitting over a lot of the
panel, so I decided that the best way forward would be to buy a new
BMH
inner wing panel (
Somerford Mini part #ABD36006
) and just replace the whole section with new metal (in the right shape). Although I would be replacing the whole
panel, I wanted to leave the existing metalwork in place until the new panel turned up, just to make sure I
didn't cut away too much!
With the A panel removed I could get the wire bush in much more easily, and cleaned it up to reveal the extent of
the corrosion (see right) - the inner bulkhead has had a few repair panels, and the metal behind the plates was in a
terrible state, lots of corroded metal still in place, rotting the new plates from the inside out! The state of
the metal under the scuttle was also very concerning and there was some surface pitting over a lot of the
panel, so I decided that the best way forward would be to buy a new
BMH
inner wing panel (
Somerford Mini part #ABD36006
) and just replace the whole section with new metal (in the right shape). Although I would be replacing the whole
panel, I wanted to leave the existing metalwork in place until the new panel turned up, just to make sure I
didn't cut away too much!
 I also had a look at the underside of the floorpan - can't see too much from the photos left and below, due to the
wooden block supporting the car being in the way, but it does look as if there might be problems there, which I was
hoping would only be surface rust - but it would be much easier to determine once the inner wing was removed and it
was all cleaned up a bit further.
I also had a look at the underside of the floorpan - can't see too much from the photos left and below, due to the
wooden block supporting the car being in the way, but it does look as if there might be problems there, which I was
hoping would only be surface rust - but it would be much easier to determine once the inner wing was removed and it
was all cleaned up a bit further.
 Once the new inner wing panel arrived and I'd checked to see where it covered, I was happy to remove the panel
completely. Getting the inner wing off proved to be quite a bit more difficult that I'd hoped, mainly due to
surface pitting obscuring the location of the spot welds. My original approach was to clean all the paint and
underseal off with the wire brush, then drill out the spot welds. This then leaves the panel free of the rest of
the car and a few taps with a hammer or a broad bladed
cold chisel
to the panel seams gets the panel out. Unfortuneately with some spot welds obscured by rust, and some of the repair
patches seam welds penetrating through onto the other panels behind (as they should if possible) removing the inner
Once the new inner wing panel arrived and I'd checked to see where it covered, I was happy to remove the panel
completely. Getting the inner wing off proved to be quite a bit more difficult that I'd hoped, mainly due to
surface pitting obscuring the location of the spot welds. My original approach was to clean all the paint and
underseal off with the wire brush, then drill out the spot welds. This then leaves the panel free of the rest of
the car and a few taps with a hammer or a broad bladed
cold chisel
to the panel seams gets the panel out. Unfortuneately with some spot welds obscured by rust, and some of the repair
patches seam welds penetrating through onto the other panels behind (as they should if possible) removing the inner
 wing required grinding off quite a few of the seam welds, and (very carefully!) grinding the metal in the area
where I thought there should be a spot weld until it ground the inner wing panel away, without going into the A
pillar panels behind.
wing required grinding off quite a few of the seam welds, and (very carefully!) grinding the metal in the area
where I thought there should be a spot weld until it ground the inner wing panel away, without going into the A
pillar panels behind.
I also found a couple of beads of weld on the tip of the upper bulkhead-inner wing joint, which had to be ground off to allow the inner wing to come free. After all that, the inner wing finally came off the car, in all its oxidised glory! (Right, viewed from the interior side of the panel - the large round hole with a lip on it is the hole for the heater's fresh air feed).
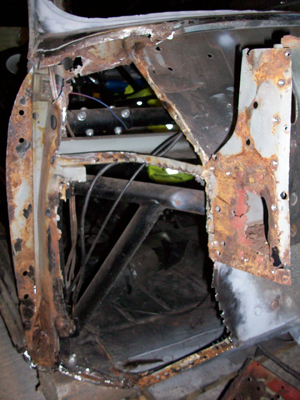 The picture on the left shows the car with the inner wing panel removed - all the rusty areas that weren't
apparent when the wing was still on the car are now clearly visible. The more I dig into this project, the more
repair work I find - still, I should be a welding diva by the time El Minoir is finished! On the plus side,
although the outer A pillar looks quite corroded in the left hand picture, it's actually in very good condition
with a small amount of surface rust and some corroded metal from the inner wing still stuck to it in a couple of
places, all of which will come off without much hassle.
The picture on the left shows the car with the inner wing panel removed - all the rusty areas that weren't
apparent when the wing was still on the car are now clearly visible. The more I dig into this project, the more
repair work I find - still, I should be a welding diva by the time El Minoir is finished! On the plus side,
although the outer A pillar looks quite corroded in the left hand picture, it's actually in very good condition
with a small amount of surface rust and some corroded metal from the inner wing still stuck to it in a couple of
places, all of which will come off without much hassle.
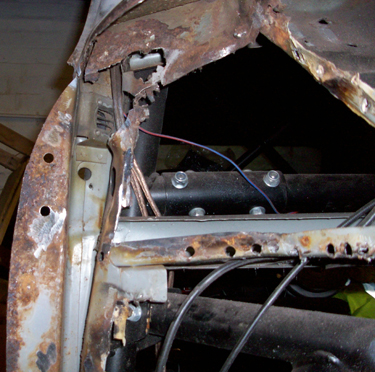
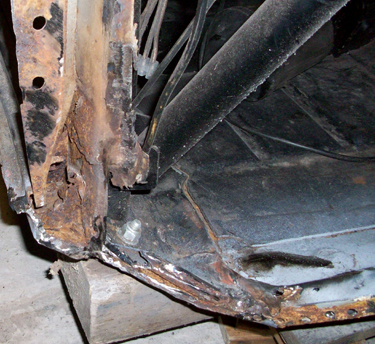
The pictures below show:
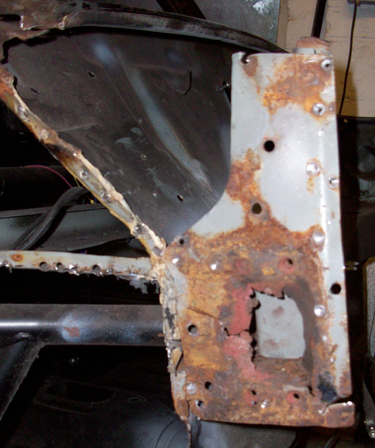
The suspension mount area and the double-skin plate (left ) - in very poor shape, but at least it's just a flat panel so it'll be easy to make up a replacement - I don't think I'll replace it with a like for like - I'll probably extend it to right up under the scuttle, to add strength to the area that the front subframe brace bars bolt to - more of that on the repair page.
The upper end of the inner A pillar (top right) - a lot of what looks like just surface rust, and a nasty looking bit where the Scuttle meets the A pillar - you can still see some of the old inner wing up in there - that will be removed before I replace the inner wing - probably a couple of small patches required in to the right of the A pillar at the top, but that shouldn't be too difficult!
The lower end of the inner A pillar (bottom right) - there is a lot of rot in the base of the inner A pillar, particularly in the sill section, so it looks like the sills will be coming off - there is a chunk of rusty metal visible in the cavity between the inner and outer sills, and the rest of that section of floor looks pretty bad. I'll be cleaning this up thoroughly with the wire brush, which should give a much better picture of the state of the A Pillar. This bottom A pillar/floor area had a couple of plates over it, which appear to have trapped in a lot of rust!. Particularly concerning as this is where the Rollcage front leg mounts to the floor!
The presence of an old rivet that held the fresh air hose in place amongst the jagged metal (bottom left of the left hand picture) and the upainted weld burn on the right hand picture (the holes in the right hand picture were made by my grinding the weld bead on the other side) does not imply that there was a greal deal of care taken over the work!
Another outing for the grinder mounted wire brush and the two plates that were put in around the air vent on the
offside can be seen, which look OK from the outside, but from the aove I was concerned that there might be hidden
rust plated over, given that the engine bay side of the wings didn't show any signs of the plates. Also, looking at
the bottom edge of the scuttle panel (closeup, right) it was clear that the plates had not been put in quite as
carefully as they should (witness the 4mm gap - I haven't ground that out, just used a wire brush to take the seam
sealer etc off)!
You can see on the A panel edge (left hand side of the photo) that the scuttle does not meet this new plate (called
either the 'Scuttle Closing plate' or 'Gusset plate -
Mini Spares part #14A8348
') and it looks like a patch section was (half-heartedly) put in at the A panel end to join the two together. Now as this looks like a great water/rust/general crud trap, I figured I'd better grind out the weld and have a look behind.
This was easier said than done (isn't it always?), as you can see from the picture left (underside of the offside scuttle from the inner wing area) it has been seam welded to the new plates (as it should have been), but in an area it's not easy to get a grinder in without going right through into whatever is behind the plates...
If you're wondering what the 13mm hole in the inner wing under the scuttle is for (top right had side of the picture, it's the rear mount for the hinge used in my somewhat overly complicated flip-front system, which won't be getting re-fitted - with a few more years, a lot more experience (and many more pies) under my belt I have a much better solution in mind - see here.
A quick buzz with a cutting disc in the grinder against the join, and the plate was free of the scuttle, but
getting the other two plates free was considerably more difficult, and involved a lot of careful grinding to avoid
any unnecessary damage to surrounding metal. Once the plates were removed I was greeted with the delightful view on
the right.
When I cut through the weld holding the Scuttle Closing plate in place and dropped it out, I was very surprised to
see that it had some extra bits of sheet steel welded on to it (left).My Original plan was to cut out the rusted metal and make up some replacement panels out of steel sheet, but as the rust looked more extensive than I had first thought, I decided to remove the A Panel to enable me to get a better look at the bulkhead area. (A decision made easier by the fact that the A panel was only tacked on by a weld top and bottom and three tacks on the door side!).
With the A panel removed I could get the wire bush in much more easily, and cleaned it up to reveal the extent of
the corrosion (see right) - the inner bulkhead has had a few repair panels, and the metal behind the plates was in a
terrible state, lots of corroded metal still in place, rotting the new plates from the inside out! The state of
the metal under the scuttle was also very concerning and there was some surface pitting over a lot of the
panel, so I decided that the best way forward would be to buy a new
BMH
inner wing panel (
Somerford Mini part #ABD36006
) and just replace the whole section with new metal (in the right shape). Although I would be replacing the whole
panel, I wanted to leave the existing metalwork in place until the new panel turned up, just to make sure I
didn't cut away too much!
I also had a look at the underside of the floorpan - can't see too much from the photos left and below, due to the
wooden block supporting the car being in the way, but it does look as if there might be problems there, which I was
hoping would only be surface rust - but it would be much easier to determine once the inner wing was removed and it
was all cleaned up a bit further.
Once the new inner wing panel arrived and I'd checked to see where it covered, I was happy to remove the panel
completely. Getting the inner wing off proved to be quite a bit more difficult that I'd hoped, mainly due to
surface pitting obscuring the location of the spot welds. My original approach was to clean all the paint and
underseal off with the wire brush, then drill out the spot welds. This then leaves the panel free of the rest of
the car and a few taps with a hammer or a broad bladed
cold chisel
to the panel seams gets the panel out. Unfortuneately with some spot welds obscured by rust, and some of the repair
patches seam welds penetrating through onto the other panels behind (as they should if possible) removing the inner
wing required grinding off quite a few of the seam welds, and (very carefully!) grinding the metal in the area
where I thought there should be a spot weld until it ground the inner wing panel away, without going into the A
pillar panels behind. I also found a couple of beads of weld on the tip of the upper bulkhead-inner wing joint, which had to be ground off to allow the inner wing to come free. After all that, the inner wing finally came off the car, in all its oxidised glory! (Right, viewed from the interior side of the panel - the large round hole with a lip on it is the hole for the heater's fresh air feed).
The picture on the left shows the car with the inner wing panel removed - all the rusty areas that weren't
apparent when the wing was still on the car are now clearly visible. The more I dig into this project, the more
repair work I find - still, I should be a welding diva by the time El Minoir is finished! On the plus side,
although the outer A pillar looks quite corroded in the left hand picture, it's actually in very good condition
with a small amount of surface rust and some corroded metal from the inner wing still stuck to it in a couple of
places, all of which will come off without much hassle.The pictures below show:
The suspension mount area and the double-skin plate (left ) - in very poor shape, but at least it's just a flat panel so it'll be easy to make up a replacement - I don't think I'll replace it with a like for like - I'll probably extend it to right up under the scuttle, to add strength to the area that the front subframe brace bars bolt to - more of that on the repair page.
The upper end of the inner A pillar (top right) - a lot of what looks like just surface rust, and a nasty looking bit where the Scuttle meets the A pillar - you can still see some of the old inner wing up in there - that will be removed before I replace the inner wing - probably a couple of small patches required in to the right of the A pillar at the top, but that shouldn't be too difficult!
The lower end of the inner A pillar (bottom right) - there is a lot of rot in the base of the inner A pillar, particularly in the sill section, so it looks like the sills will be coming off - there is a chunk of rusty metal visible in the cavity between the inner and outer sills, and the rest of that section of floor looks pretty bad. I'll be cleaning this up thoroughly with the wire brush, which should give a much better picture of the state of the A Pillar. This bottom A pillar/floor area had a couple of plates over it, which appear to have trapped in a lot of rust!. Particularly concerning as this is where the Rollcage front leg mounts to the floor!