Finding all Corrosion
 Now that I had everything removed from the front end that wasn't welded in place, it was time to clean it up,
remove all the oil, stonechip and grime that had accumulated over the last 20 years and see what metal needed
replacing - I wasn't expecting much in the way of corrosion, as the good old A-series gives the engine bay a
Now that I had everything removed from the front end that wasn't welded in place, it was time to clean it up,
remove all the oil, stonechip and grime that had accumulated over the last 20 years and see what metal needed
replacing - I wasn't expecting much in the way of corrosion, as the good old A-series gives the engine bay a
 liberal coating of oil, which should have protected it from corrosion to a very large degree...
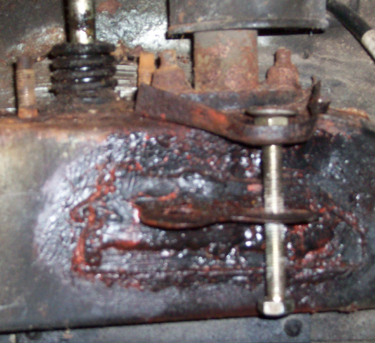
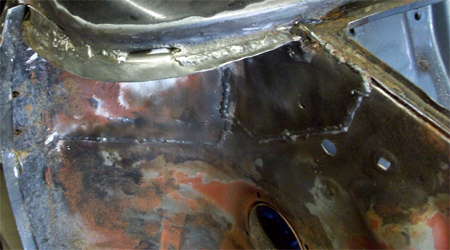
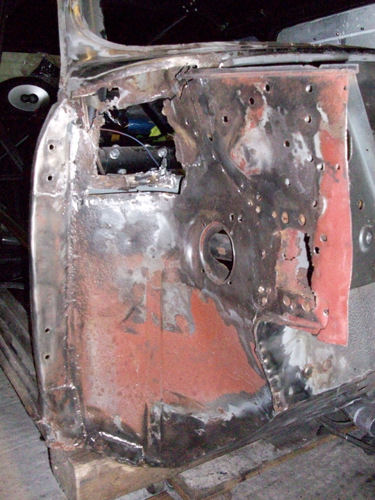
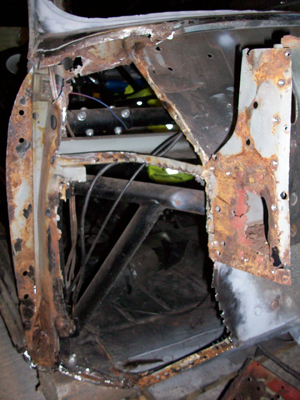
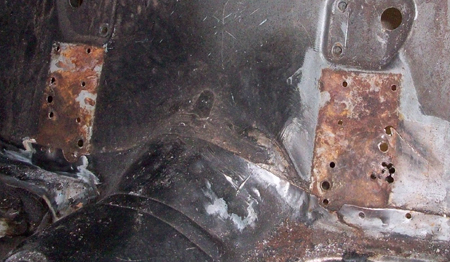
I wasn't too far wrong on the bulkhead, only some minor surface corrosion, but the picture right shows the upper engine steady mount as it looked when I'd removed the engine.
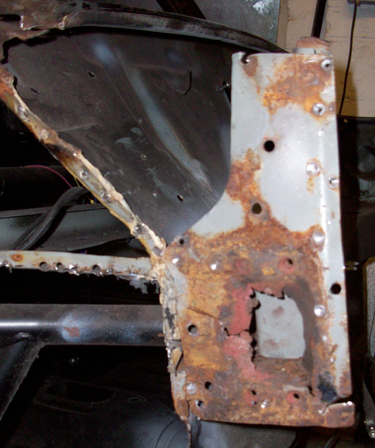
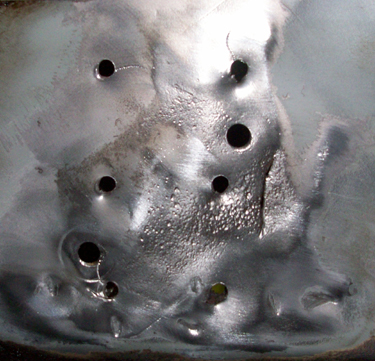
The top section of the upper engine steady bracket is part of a plate that sits under the brake and clutch master cylinders, which was in a terrible state, see the picture left - you can just make out that a washer has been welded over the corroded bolt hole at some point to repair it - quite common practice as far as I know, and not a problem as long as the rest of the plate is OK, but given the poor state of the plate, I'll be replacing this rather than arse about repairing a corroded and inexpensive part.
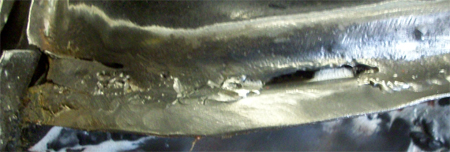
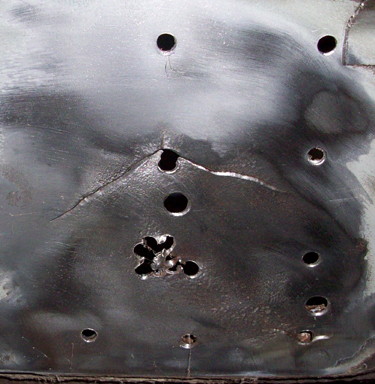
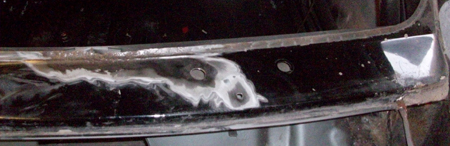
There is obviously a lot of something built up around the lower bracket - I thought the build up was going to be seam sealer or similar, but when I took a wire brush to it and removed all the paint, it turned out to be weld! (see left).
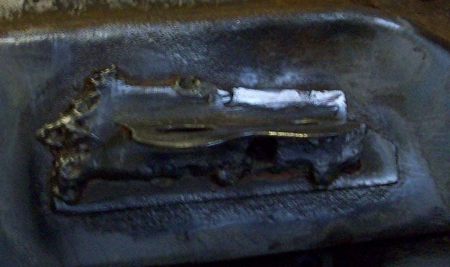 Now I'm not the world's best welder by any stretch of the imagination, but that really looks like some pretty poor
welding to me. On the one hand it hasn't broken (with the shell taking enough of a wallop to crack the bulkhead by
the lower front subframe mounts), but on the other hand the person who did it obviously wasn't taking enough care
about the job they did... You can also make out from the photo (look at the upper right) that the crossmember has
been dented inwards - this could be due to the bump that cracked the lower subframe mount area, or just part of the
generally poor job of fixing the upper engine steady to the crossmember, I can't really tell. I think this might
well have been done as part of the engine swap (from 998 to 1275 MG Metro) - I think the small and big bore engines
had different upper engine steady mounts. Coupled with the far too long machine screw that was holding the upper
engine mount to the bulkhead (see the top photo), and it's clearly not the best attention to detail!
Now I'm not the world's best welder by any stretch of the imagination, but that really looks like some pretty poor
welding to me. On the one hand it hasn't broken (with the shell taking enough of a wallop to crack the bulkhead by
the lower front subframe mounts), but on the other hand the person who did it obviously wasn't taking enough care
about the job they did... You can also make out from the photo (look at the upper right) that the crossmember has
been dented inwards - this could be due to the bump that cracked the lower subframe mount area, or just part of the
generally poor job of fixing the upper engine steady to the crossmember, I can't really tell. I think this might
well have been done as part of the engine swap (from 998 to 1275 MG Metro) - I think the small and big bore engines
had different upper engine steady mounts. Coupled with the far too long machine screw that was holding the upper
engine mount to the bulkhead (see the top photo), and it's clearly not the best attention to detail!You can't quite make it out in the picture, but the top right section of the mount hasn't got any weld on it at all, and I can't figure out why someone would do that, as it seems very odd not to bother welding on the last section. My theory is that whoever did it was stitching the mount on section by section to avoid warping the crossmember, and forgot to come back and do the last section...
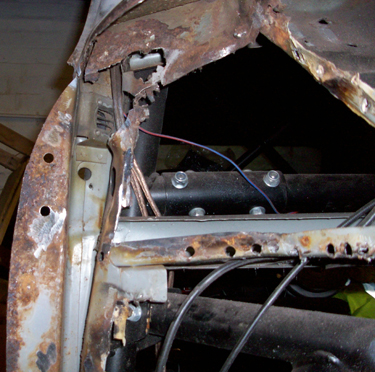
Moving round to the inner wings, other than the nasty corrosion behind the damper mounts, they are pretty clear - during the last restoration (when I paid someone else to do all the welding) there was some rust around the fresh air vents in the top of the inner wings - the solution was to cut out the rust and then just plate over the vent holes rather than put in new vent hole sections to keep the cost down. The whole section was then covered in a load of stonechip type substance, which has kept the corrosion at bay, but I wanted to clean it off and have a look behind - partially because I discoverd that an area behind the dash where the top fresh air vents used to be looks to have a some of the old corroded metal simply plated over rather than the corrosion being removed - see the photos of the below - Nearside on the left, Offside on the right.
The presence of an old rivet that held the fresh air hose in place amongst the jagged metal (bottom left of the left hand picture) and the upainted weld burn on the right hand picture (the holes in the right hand picture were made by my grinding the weld bead on the other side) does not imply that there was a greal deal of care taken over the work!
 Another outing for the grinder mounted wire brush and the two plates that were put in around the air vent on the
offside can be seen, which look OK from the outside, but from the aove I was concerned that there might be hidden
rust plated over, given that the engine bay side of the wings didn't show any signs of the plates. Also, looking at
the bottom edge of the scuttle panel (closeup, right) it was clear that the plates had not been put in quite as
carefully as they should (witness the 4mm gap - I haven't ground that out, just used a wire brush to take the seam
sealer etc off)!
Another outing for the grinder mounted wire brush and the two plates that were put in around the air vent on the
offside can be seen, which look OK from the outside, but from the aove I was concerned that there might be hidden
rust plated over, given that the engine bay side of the wings didn't show any signs of the plates. Also, looking at
the bottom edge of the scuttle panel (closeup, right) it was clear that the plates had not been put in quite as
carefully as they should (witness the 4mm gap - I haven't ground that out, just used a wire brush to take the seam
sealer etc off)!
 You can see on the A panel edge (left hand side of the photo) that the scuttle does not meet this new plate (called
either the 'Scuttle Closing plate' or 'Gusset plate -
Mini Spares part #14A8348
') and it looks like a patch section was (half-heartedly) put in to join the two together.
You can see on the A panel edge (left hand side of the photo) that the scuttle does not meet this new plate (called
either the 'Scuttle Closing plate' or 'Gusset plate -
Mini Spares part #14A8348
') and it looks like a patch section was (half-heartedly) put in to join the two together. Now as this looks like a great water/rust/general crud trap, I figured I'd better grind out the weld and have a look behind.
This was easier said than done (isn't it always?), as you can see from the picture left (underside of the offside scuttle from the inner wing area) it has been seam welded to the new plates (as it should have been), but in an area it's not easy to get a grinder in without going right through into whatever is behind the plates...
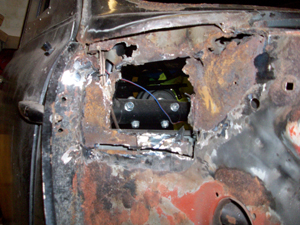
If you're wondering what the 13mm hole in the inner wing under the scuttle is for (top right had side of the picture, it's the rear mount for the hinge used in my somewhat overly complicated flip-front system, which won't be getting re-fitted - with a few more years, a lot more experience (and many more pies) under my belt I have a much better solution in mind - see here.
 A quick buzz with a cutting disc in the grinder against the join, and the plate was free of the scuttle, but
getting the other two plates free was considerably more difficult, and involved a lot of careful grinding to avoid
any unnecessary damage to surrounding metal. Once the plates were removed I was greeted with the delightful view on
the right.
A quick buzz with a cutting disc in the grinder against the join, and the plate was free of the scuttle, but
getting the other two plates free was considerably more difficult, and involved a lot of careful grinding to avoid
any unnecessary damage to surrounding metal. Once the plates were removed I was greeted with the delightful view on
the right. When I cut through the weld holding the Scuttle Closing plate in place and dropped it out, I was very surprised to
see that it had some extra bits of sheet steel welded on to it (left).
When I cut through the weld holding the Scuttle Closing plate in place and dropped it out, I was very surprised to
see that it had some extra bits of sheet steel welded on to it (left).My Original plan was to cut out the rusted metal and make up some replacement panels out of steel sheet, but as the rust looked more extensive than I had first thought, I decided to remove the A Panel to enable me to get a better look at the bulkhead area. (A decision made easier by the fact that the A panel was only tacked on by a weld top and bottom and three tacks on the door side!).
 With the A panel removed I could get the wire bush in much more easily, and cleaned it up to reveal the extent of
the corrosion (see right) - the inner bulkhead has had a few repair panels, and the metal behind the plates was in a
terrible state, lots of corroded metal still in place, rotting the new plates from the inside out! The state of
the metal under the scuttle was also very concerning and there was some surface pitting over a lot of the
panel, so I decided that the best way forward would be to buy a new
BMH
inner wing panel (
Somerford Mini part #ABD36006
) and just replace the whole section with new metal (in the right shape). Although I would be replacing the whole
panel, I wanted to leave the existing metalwork in place until the new panel turned up, just to make sure I
didn't cut away too much!
With the A panel removed I could get the wire bush in much more easily, and cleaned it up to reveal the extent of
the corrosion (see right) - the inner bulkhead has had a few repair panels, and the metal behind the plates was in a
terrible state, lots of corroded metal still in place, rotting the new plates from the inside out! The state of
the metal under the scuttle was also very concerning and there was some surface pitting over a lot of the
panel, so I decided that the best way forward would be to buy a new
BMH
inner wing panel (
Somerford Mini part #ABD36006
) and just replace the whole section with new metal (in the right shape). Although I would be replacing the whole
panel, I wanted to leave the existing metalwork in place until the new panel turned up, just to make sure I
didn't cut away too much!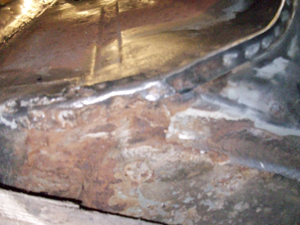 I also had a look at the underside of the floorpan - can't see too much from the photos left and below, due to the
wooden block supporting the car being in the way, but it does look as if there might be problems there, which I was
hoping would only be surface rust - but it would be much easier to determine once the inner wing was removed and it
was all cleaned up a bit further.
I also had a look at the underside of the floorpan - can't see too much from the photos left and below, due to the
wooden block supporting the car being in the way, but it does look as if there might be problems there, which I was
hoping would only be surface rust - but it would be much easier to determine once the inner wing was removed and it
was all cleaned up a bit further.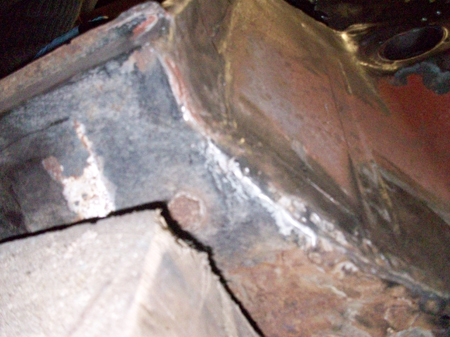 Once the new inner wing panel arrived, and I'd checked to see where it covered I was happy to remove the panel
completely. Getting the inner wing off proved to be quite a bit more difficult that I'd hoped, mainly due to
surface pitting obscuring the location of the spot welds. My original approach was to clean all the paint and
underseal off with the wire brush, then drill out the spot welds. This then leaves the panel free of the rest of
the car and a few taps with a hammer or a broad bladed
cold chisel
to the panel seams gets the panel out. Unfortuneately with some spot welds obscured by rust, and some of the repair
patches seam welds penetrating through onto the other panels behind (as they should if possible) removing the inner
Once the new inner wing panel arrived, and I'd checked to see where it covered I was happy to remove the panel
completely. Getting the inner wing off proved to be quite a bit more difficult that I'd hoped, mainly due to
surface pitting obscuring the location of the spot welds. My original approach was to clean all the paint and
underseal off with the wire brush, then drill out the spot welds. This then leaves the panel free of the rest of
the car and a few taps with a hammer or a broad bladed
cold chisel
to the panel seams gets the panel out. Unfortuneately with some spot welds obscured by rust, and some of the repair
patches seam welds penetrating through onto the other panels behind (as they should if possible) removing the inner
 wing required grinding off quite a few of the seam welds, and (very carefully!) grinding the metal in the area
where I thought there should be a spot weld until it ground the inner wing panel away, without going into the A
pillar panels behind.
wing required grinding off quite a few of the seam welds, and (very carefully!) grinding the metal in the area
where I thought there should be a spot weld until it ground the inner wing panel away, without going into the A
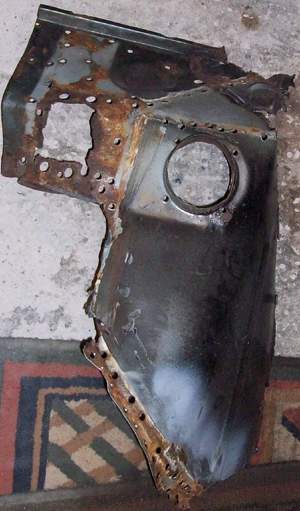
pillar panels behind. I also found a couple of beads of weld on the tip of the upper bulkhead-inner wing joint, which had to be ground off to allow the inner wing to come free. After all that, the inner wing finally came off the car, in all its oxidised glory! (Right, viewed from the interior side of the panel).
 The picture on the left shows the car with the inner wing panel removed - all the rusty areas that weren't
apparent when the wing was still on the car are now clearly visible. The more I dig into this project, the more
repair work I find - still, I should be a welding diva by the time El Minoir is finished!
The picture on the left shows the car with the inner wing panel removed - all the rusty areas that weren't
apparent when the wing was still on the car are now clearly visible. The more I dig into this project, the more
repair work I find - still, I should be a welding diva by the time El Minoir is finished!The pictures below show:
The suspension mount area and the double-skin plate (left ) - in very poor shape, but at least it's just a flat panel so it'll be easy to make up a replacement - I don't think I'll replace it with a like for like - I'll probably extend it to right up under the scuttle, to add strength to the area that the front subframe brace bars bolt to - more of that on the repair page.
The upper end of the A pillar (top right) - a lot of what looks like just surface rust, and a nasty looking bit where the Scuttle meets the A pillar - you can still see some of the old inner wing up in there - that will be removed before I replace the inner wing - probably a couple of small patches required in to the right of the A pillar at the top, but that shouldn't be too difficult!
The lower end of the A pillar (bottom right) - there is a lot of rot in the base of the A pillar, particularly in the sill section, so it looks like the sills will be coming off - there is a chunk of rusty metal visible in the cavity between the inner and outer sills, and the rest of that section of floor looks pretty bad. I'll be cleaning this up thoroughly with the wire brush, which should give a much better picture of the state of the A Pillar. This bottom A pillar/floor area had a couple of plates over it, which appear to have trapped in a lot of rust!. Particularly concerning as this is where the Rollcage front leg mounts to the floor!
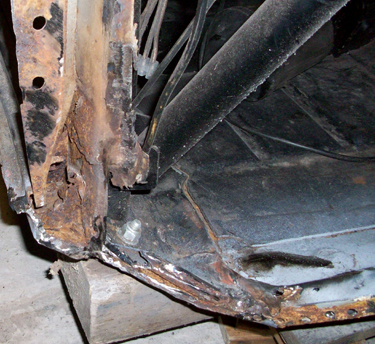
Next port of call was the bottom of the bulkhead, around the lower subframe mounts - I knew that I was going to find some problems here, as I'd already seem some cracks around the bolt hole area, but I needed to clear off all the old underseal and paint before I could be sure just what was needed. Taking advice from some very knowledgeable people on Pistonheads
 I had already decided to reinforce the area around the bolt holes by welding on some thicker sheet (16 guage
recommended - about 1.6mm in new money), so I needed all cracks, holes and rust removed before I started that! So,
twist cup wire brush back in the angle grinder, and I started on the inside of the bulkhead, revealing the factory
reinforcement plates, which look a bit small to me - the offside one had already cracked (see left). I had to
remove the existing plates to be able to insert some new (larger) plates, so I drilled out the spot welds,
(including a few along the floor to bulkhead area, to allow for inserting larger plates into between the bulkhead
I had already decided to reinforce the area around the bolt holes by welding on some thicker sheet (16 guage
recommended - about 1.6mm in new money), so I needed all cracks, holes and rust removed before I started that! So,
twist cup wire brush back in the angle grinder, and I started on the inside of the bulkhead, revealing the factory
reinforcement plates, which look a bit small to me - the offside one had already cracked (see left). I had to
remove the existing plates to be able to insert some new (larger) plates, so I drilled out the spot welds,
(including a few along the floor to bulkhead area, to allow for inserting larger plates into between the bulkhead
 and floor section) and prised the plates off with a prybar, leaving the nice rusty looking metal behind (right):
Fortunately a quick blast with the wire brush showed it was only surface rust, which was a relief - I really did not want to be replacing large sections of the bulkhead, with the associated difficulty in making sure the subframe bolt holes remained in the right place!
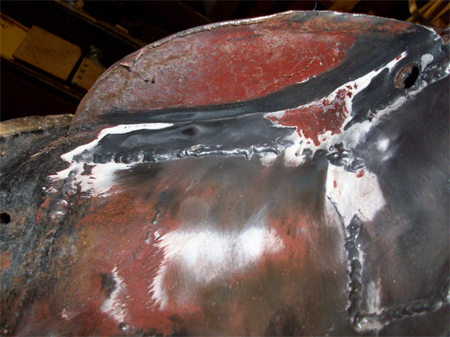
You can see from the photos above that there is a large crack in the bulkhead on the offside needing repair, there was also a crack on the nearside, which you can see in the photos below (offside on the left, nearside on the right) which were taken following cleaning up the outside of the bulkhead with the wire brush.
The messy hole in the middle of the left photo is due to me not being able to find the spot weld to drill out - there was a fair amount of surface pitting (no doubt contributing to the bulkhead cracking) and it was one area I couldn't see the spot weld clearly, so took a few attempts. That will be plated up with a small patch.
Moving back up to the scuttle, I decided to remove the windscreen to get a look at some rust I could see bubbling up underneath the paintwork.
This is quite an easy job - prise the filler strip out of the channel in the rubber with a scredriver (carefully so not to break it), then just gently push the windscreen out from the inside of the car, it'll pop right out of the rubber. Wearing goggles and thick gloves is a good idea, in case it shatters or cracks.
With the windscreen removed, I took the wire brush to some rust bubbles I could see around the windscreen seal:
Not quite what I was hoping to find, but it could have been a lot worse! Most of the rust seems to be concentrated in a few patches where the scuttle panel joins to the bulkhead, with the scuttle panel having done most of the rusting. There is only one really bad area where the seam joining the two has completely rusted away, but even so these will all require patches rather than wholesale panel replacement (luckily for my wallet).