Clearing the Front End
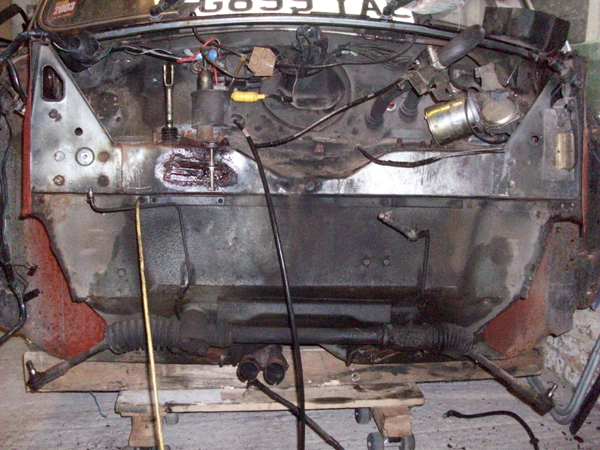
As can be seen from the photo above, there's still a fair few things to remove from the front end before I can
really get to grips with finding the corrosion and fixing it - the picture shows the brake servo and master
cylinder already removed. my First analysis of remaining bits was:
Steering Rack, clutch Master Cylinder, Brake/Clutch Pedals, Heater matrix/Motor unit, Fuse Box, Wiring loom (which I plan to replace, it looks a right mess!), windscreen wiper system, speedo drive, throttle cable and screenwash jets.
Naturally this couldn't go easily, could it?
No, of course not - a combination of my own impatience and the heavy coating of oil sludge all over the steering rack made it much more difficult than it really needed to be. Had I read the instructions in the Haynes Manual, I would have known to COMPLETELY remove the 'pinch bolt' on the base of the steering column, and it would have dropped out reasonably easily. Had it not been covered in sludge, I would have been able to recognise that it was stuck, not just being difficult :-) But you live and learn. Well, sometimes learn.
The Brake Master Cylinder and Servo I removed as a single unit - I first removed the brake pipes to the bias unit, then just undid the bolts, removed the roll pin connecting the master cylinder linkage to the pedal (remove a split pin and it pushes out) and it all lifts off, nice and easy :-)
The Clutch was not so easy - I had to remove the roll pin holding the clutch master cylinder to the pedal, and getting the split pin out was a right pain - upside down in the footwell, awkward little space, but it eventually came out, and the clutch master cylinder lifted off the two bolts holding it down - these are captive bolts, attached to the clutch/brake pedal mounting bracket inside the car.
Then I thought it would probably help to remove the dashboard (I made up last time, and isn't the best bit of work ever assembled!) and the clocks/Speedo drive etc, so I just pulled out the dashboard (it was just wedged between the Roll Cage uprights, due to a scoolboy error by me - I made up a mould for the dashboard, measured to perfectly fit between the uprights, but forgot to account for the thickness of the fibreglass I was going to lay over it, hence it being a bit too big for the gap) unplugged the wiring and removed the speedo drive (twist to release then pull out).
Next I wanted to remove the clutch and brake pedals (they share a mounting case), but having learned my lesson, I consulted the Haynes Manual and it told me to remove the heater unit first, which I did - a doddle, just slacken off the bolt on the nearside rear of the heater unit, then remove the two phillips screws holding the front to the dash rail, and lift it off it's mounts. The heater hoses are long enough to give you plenty of slack to get it off the mounts then pull the hoses through from the engine compartment - saves spilling coolant all over the interior! And given the manky state of the coolant I drained out of it later, a very good call!
With the Heater unit out of the way I could get access to the bolts holding in the clutch and brake pedal mounting bracket - two at the back into the front bulkhead and one particularly annoying one at the front. The front bolt is shared with one of the steering column upper retaining bracket bolts, and is a shear bolt, meaning getting it off theoretically involves using a grinder to cut a slot into it and then taking it off with a screwdriver, or in my case using a regular grinding disc in the angle grinder as I'd run out of Dremel discs, finding that this leaves a slot far too wide for a screwdriver and using a cold chisel instead.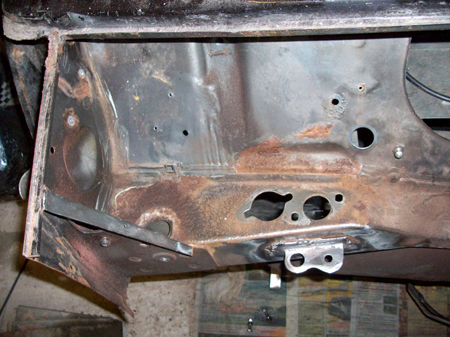 The second bolt in the bracket did not go as well, and I ended up breaking off the steering column bracket and just
grinding the head off, after which the bolt unscrewed easily with my fingers (once it had cooled down). These bolts
turn out to be held in not by captive nuts welded to the cross bar, but by the bracket shown left - which I
thought a little odd. Still, with those two bolts removed, a quick application of the
Birmingham Screwdriver
to the captive bolts from the engine bay and the pedal bracket dropped out into the driver's footwell, leaving a
the offside part of the upper bulkhead clear (see right).
The second bolt in the bracket did not go as well, and I ended up breaking off the steering column bracket and just
grinding the head off, after which the bolt unscrewed easily with my fingers (once it had cooled down). These bolts
turn out to be held in not by captive nuts welded to the cross bar, but by the bracket shown left - which I
thought a little odd. Still, with those two bolts removed, a quick application of the
Birmingham Screwdriver
to the captive bolts from the engine bay and the pedal bracket dropped out into the driver's footwell, leaving a
the offside part of the upper bulkhead clear (see right).
Next I removed the accelerator pedal - just undo the two bolts that go into captive nuts on the bulkhead and pull it out. The cable just pulls through the grommet in the bulkhead and slips out of the slot in the top of the accelerator pedal - this was in good condition, so I'll be able to just reuse it - the pedal just needs a coat of paint.
The Wiper system I removed as a single unit - as per the Haynes Manual, prise off the wiper arms (they are a push fit onto the spindles, i levered them off with a pry bar, as they were quite stuck in place!) then undo the bolt that clamps the spindle onto the panel on each wiper, remove the two phillips screws holding the wiper motor bracket down, remove the wiper motor bracket, unplug the wiring and lift the motor up then slide the spindle out through the holes.
Screenwash jets were a doddle, although bizarrely enough clearly not a matched pair? Just pull off the hose, and one jet was a push fit into the panel, the second (offside) having a thread on the jet body and a metal nut clamping it onto the panel - a much better fixing, if more awkward to remove. When I refit it all I think I will be replacing these jets with a more modern (heated) design that will sit on the bonnet and give a better coverage of the windscreen, but I'll definitely be trying a few designs and locations to see what works best.
 Wiring loom was not too complicated - a fair chunk was already hanging loose after having disconnected it from the
engine before I removed the front subframe, and as I had convereted to flip-front all the Headlight/indicators
wiring was already removed and attached to the flip-front, connected to the old loom by a trailer electrics connector
I bought from Halfords (the round black thing with the yellow arrow pointing at it in the picture left). Removing
the fusebox was just two philips screws - one top, one bottom followed by a quick tap to knock it free from 20
years of grime.
Wiring loom was not too complicated - a fair chunk was already hanging loose after having disconnected it from the
engine before I removed the front subframe, and as I had convereted to flip-front all the Headlight/indicators
wiring was already removed and attached to the flip-front, connected to the old loom by a trailer electrics connector
I bought from Halfords (the round black thing with the yellow arrow pointing at it in the picture left). Removing
the fusebox was just two philips screws - one top, one bottom followed by a quick tap to knock it free from 20
years of grime.
Most of the wiring loom then runs into the car through the hole in the removable panel in the centre of the bulkhead, with the exception of the part of the loom that runs to the back of the car for the rear lights/fuel guage etc, which is connected to the main part of the loom by a few individual bullet connectors (got to love BL wiring - why isn't it a multiplug?) Disconnecting these proved very difficult (they are unlikely to have ever been disconnected, which means it could have been 20 years since these were last apart!), and two or three snapped the wire off rather than come apart - not an isue as I'll be remaking the loom and will replace the bullet connectors with a proper multiplug connection!
With the rear loom section disconnected, I removed the four phillips head machine screws holding the rectangular black plate in the photo above onto the bulkhead (from the inside of the car) and pulled it free. I then realised that I'd need to disconnect the switch panel wires (fortunately these are just mulitplugs onto the back of the switches) and pulled the loom out through the hole in the bulkhead (the cover plate was a bit tricky to fit out of the hole, but it does fit through!).
Next I decided to remove the switch panel from the inside - not that it needs to come out to work on the front, but I thought I might as well while I was getting the everything else stripped out from around the bulkhead. That is just held in by two nuts behind the dash rail, it come out easily, then just pull the heater and choke cables through the grommets in the bulkhead - you can see it top right next to the wiring loom above. Both the choke and heater cables' outer sheath was quite damaged in a fair few places, so I'll be replacing those with new ones (I am also thinking about replacing the heater cable and valve with an electric/thermostatic one from a modern car, but we'll see how far along I get with that idea, but I do fancy the extra flexibility of a thermostatic switch and not having to have a cable running directly to the valve).
Steering Rack, clutch Master Cylinder, Brake/Clutch Pedals, Heater matrix/Motor unit, Fuse Box, Wiring loom (which I plan to replace, it looks a right mess!), windscreen wiper system, speedo drive, throttle cable and screenwash jets.
Naturally this couldn't go easily, could it?
No, of course not - a combination of my own impatience and the heavy coating of oil sludge all over the steering rack made it much more difficult than it really needed to be. Had I read the instructions in the Haynes Manual, I would have known to COMPLETELY remove the 'pinch bolt' on the base of the steering column, and it would have dropped out reasonably easily. Had it not been covered in sludge, I would have been able to recognise that it was stuck, not just being difficult :-) But you live and learn. Well, sometimes learn.
The Brake Master Cylinder and Servo I removed as a single unit - I first removed the brake pipes to the bias unit, then just undid the bolts, removed the roll pin connecting the master cylinder linkage to the pedal (remove a split pin and it pushes out) and it all lifts off, nice and easy :-)
The Clutch was not so easy - I had to remove the roll pin holding the clutch master cylinder to the pedal, and getting the split pin out was a right pain - upside down in the footwell, awkward little space, but it eventually came out, and the clutch master cylinder lifted off the two bolts holding it down - these are captive bolts, attached to the clutch/brake pedal mounting bracket inside the car.
Then I thought it would probably help to remove the dashboard (I made up last time, and isn't the best bit of work ever assembled!) and the clocks/Speedo drive etc, so I just pulled out the dashboard (it was just wedged between the Roll Cage uprights, due to a scoolboy error by me - I made up a mould for the dashboard, measured to perfectly fit between the uprights, but forgot to account for the thickness of the fibreglass I was going to lay over it, hence it being a bit too big for the gap) unplugged the wiring and removed the speedo drive (twist to release then pull out).
Next I wanted to remove the clutch and brake pedals (they share a mounting case), but having learned my lesson, I consulted the Haynes Manual and it told me to remove the heater unit first, which I did - a doddle, just slacken off the bolt on the nearside rear of the heater unit, then remove the two phillips screws holding the front to the dash rail, and lift it off it's mounts. The heater hoses are long enough to give you plenty of slack to get it off the mounts then pull the hoses through from the engine compartment - saves spilling coolant all over the interior! And given the manky state of the coolant I drained out of it later, a very good call!
With the Heater unit out of the way I could get access to the bolts holding in the clutch and brake pedal mounting bracket - two at the back into the front bulkhead and one particularly annoying one at the front. The front bolt is shared with one of the steering column upper retaining bracket bolts, and is a shear bolt, meaning getting it off theoretically involves using a grinder to cut a slot into it and then taking it off with a screwdriver, or in my case using a regular grinding disc in the angle grinder as I'd run out of Dremel discs, finding that this leaves a slot far too wide for a screwdriver and using a cold chisel instead.
The second bolt in the bracket did not go as well, and I ended up breaking off the steering column bracket and just
grinding the head off, after which the bolt unscrewed easily with my fingers (once it had cooled down). These bolts
turn out to be held in not by captive nuts welded to the cross bar, but by the bracket shown left - which I
thought a little odd. Still, with those two bolts removed, a quick application of the
Birmingham Screwdriver
to the captive bolts from the engine bay and the pedal bracket dropped out into the driver's footwell, leaving a
the offside part of the upper bulkhead clear (see right).Next I removed the accelerator pedal - just undo the two bolts that go into captive nuts on the bulkhead and pull it out. The cable just pulls through the grommet in the bulkhead and slips out of the slot in the top of the accelerator pedal - this was in good condition, so I'll be able to just reuse it - the pedal just needs a coat of paint.
The Wiper system I removed as a single unit - as per the Haynes Manual, prise off the wiper arms (they are a push fit onto the spindles, i levered them off with a pry bar, as they were quite stuck in place!) then undo the bolt that clamps the spindle onto the panel on each wiper, remove the two phillips screws holding the wiper motor bracket down, remove the wiper motor bracket, unplug the wiring and lift the motor up then slide the spindle out through the holes.
Screenwash jets were a doddle, although bizarrely enough clearly not a matched pair? Just pull off the hose, and one jet was a push fit into the panel, the second (offside) having a thread on the jet body and a metal nut clamping it onto the panel - a much better fixing, if more awkward to remove. When I refit it all I think I will be replacing these jets with a more modern (heated) design that will sit on the bonnet and give a better coverage of the windscreen, but I'll definitely be trying a few designs and locations to see what works best.
Wiring loom was not too complicated - a fair chunk was already hanging loose after having disconnected it from the
engine before I removed the front subframe, and as I had convereted to flip-front all the Headlight/indicators
wiring was already removed and attached to the flip-front, connected to the old loom by a trailer electrics connector
I bought from Halfords (the round black thing with the yellow arrow pointing at it in the picture left). Removing
the fusebox was just two philips screws - one top, one bottom followed by a quick tap to knock it free from 20
years of grime.Most of the wiring loom then runs into the car through the hole in the removable panel in the centre of the bulkhead, with the exception of the part of the loom that runs to the back of the car for the rear lights/fuel guage etc, which is connected to the main part of the loom by a few individual bullet connectors (got to love BL wiring - why isn't it a multiplug?) Disconnecting these proved very difficult (they are unlikely to have ever been disconnected, which means it could have been 20 years since these were last apart!), and two or three snapped the wire off rather than come apart - not an isue as I'll be remaking the loom and will replace the bullet connectors with a proper multiplug connection!
With the rear loom section disconnected, I removed the four phillips head machine screws holding the rectangular black plate in the photo above onto the bulkhead (from the inside of the car) and pulled it free. I then realised that I'd need to disconnect the switch panel wires (fortunately these are just mulitplugs onto the back of the switches) and pulled the loom out through the hole in the bulkhead (the cover plate was a bit tricky to fit out of the hole, but it does fit through!).
Next I decided to remove the switch panel from the inside - not that it needs to come out to work on the front, but I thought I might as well while I was getting the everything else stripped out from around the bulkhead. That is just held in by two nuts behind the dash rail, it come out easily, then just pull the heater and choke cables through the grommets in the bulkhead - you can see it top right next to the wiring loom above. Both the choke and heater cables' outer sheath was quite damaged in a fair few places, so I'll be replacing those with new ones (I am also thinking about replacing the heater cable and valve with an electric/thermostatic one from a modern car, but we'll see how far along I get with that idea, but I do fancy the extra flexibility of a thermostatic switch and not having to have a cable running directly to the valve).