The Saga Begins Once More...
 "Ill just have a look at the metal behind the brace bars before I start making the brackets to mount the
new hinges for the front end" I thought.
"Ill just have a look at the metal behind the brace bars before I start making the brackets to mount the
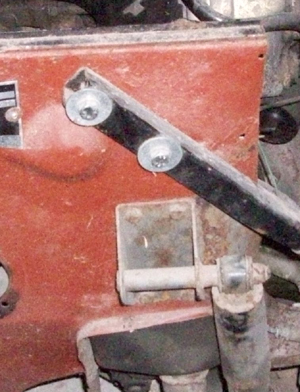
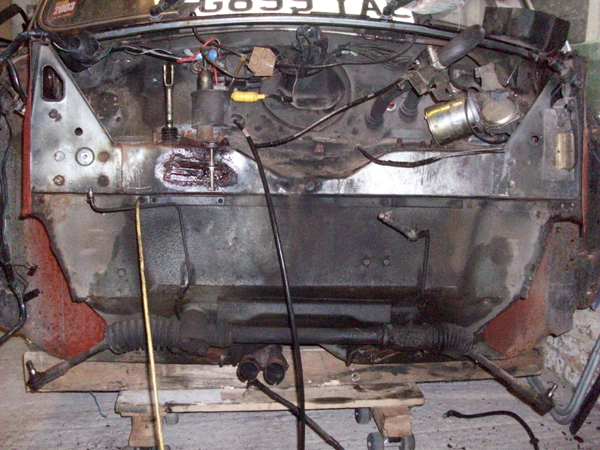
new hinges for the front end" I thought.A quick inspection revealed the crack in the metal just forward of the top subframe mount (just below the brace bar and the top of the damper in the picture right, see the yellow arrow in the photo below for a better look).
Realising this is not good, but thinking that I could get away with just trimming off the cracked metal (it's not spread to a structural part yet, so I could trim it off to prevent the crack spreading and still be OK) I decided to remove the Brace Bar and Damper mount to get better access and check out the metal behind, while at the same time take the opportunity to replace the slightly rusty looking damper mounting bolts.
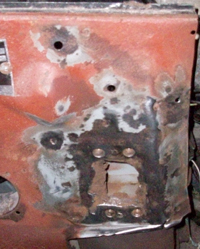
Good job I did, see below! The metal behind the damper mount has completely rotted away (when I took the wire brush to it a big chunk of oxidised metal just fell out leaving the hole you see below!) and you can see the back of the damper mount is very heavily corroded, just starting to break through to the front surface. This was missed during the first restoration, as there was no need for Southam Mini & Metro Centre to remove the front suspension components, and as it all seemed quite solid you couldn't tell.
 This came as a bit of a shock, and was a pain as I now I'd found this on the offside, I knew I'd better take the
front subframe out to get a really good look at the area and affect a proper repair, as well as thoroughly
inspect the rest of the front end to see what other nasty little rusty suprises might be waiting for me :-)
This came as a bit of a shock, and was a pain as I now I'd found this on the offside, I knew I'd better take the
front subframe out to get a really good look at the area and affect a proper repair, as well as thoroughly
inspect the rest of the front end to see what other nasty little rusty suprises might be waiting for me :-)Sure enough, removal of the nearside damper mount revealed more of the same (see right), and a bit more digging around found rust on the top of the inner wings, and on the front bulkhead, so I decided to remove absolutely everything from the front and find all hidden rust before I went any further.
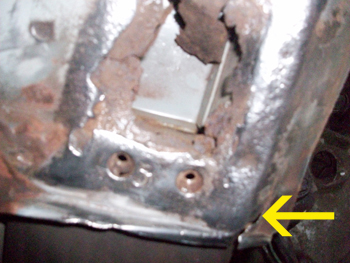
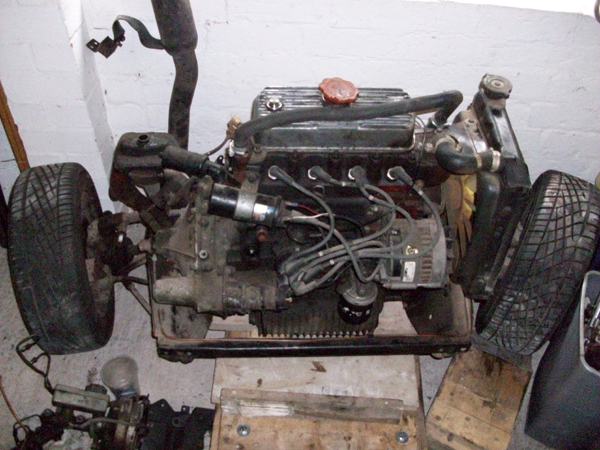
Removing the front subframe is, in theory, quite straightforward - simply disconnect fuel line, brake line (just the line from the balancer located on the offside bulkhead under the master cylinder, see arrows below for disconnections), exhaust, gearshift mechanism (2 bolts to the rear of the gearknob, see here for a more detailed description on removing the gearshift mechanism and the fun I had fitting a quickshift), upper engine steady, throttle cable, choke cable and speedo drive.
The speedo drive is particularly awkward - I found it impossible to get a decent purchase on it with the engine in the car - it is possible to remove the entire speedo drive mechanism that is held in by a single 1/2" head bolt just below where the cable goes into the gearbox, by removing that bolt and pulling it all out (as reccommended in the Haynes Manual), but there's not much room to do that either - in hindsight I'd say just remove it from the back of the speedo and pull the cable out that way!
To remove the subfrme itself, there are six location points: Two on the lower part of the bulkhead, two at the front (replaced by the brace bars on mine, having converted to flip front) and two on the crossmember, above the spring mounts, sometimes called the tower bolts.
With the car already up in the air on axle stands for removing the exhaust etc I put a large block of wood under the front floorpan, on top of a trolley my Brother made from some roller skate wheels and scrap timber (you can see it in the picture below) - sounds dodgy, but works a treat. I then jacked up the front, removed the axle stands and lowered to down onto the wooden block ready to get the subframe off
First I removed the two lower bulkhead mounts by undoing the nuts (needed a 1/2" spanner/socket on mine) then I removed the remaining brace bar. I had already replaced the lower bulkhead mounts with Solid Versions (Mini Spares part# C-STR642) before I converted to a flip front, so that was one less worry about siezed nuts!.
The two large tower bolts are 1 5/16th (33.4mm) across the flats (according to the IME ) - I had to go to Halfords and buy a new socket just for this job (still, any excuse for more tools). As I hadn't found the above link at the time, I guessed on a 34mm socket, as at Ł10 each I didn't want to buy both 33mm and 34mm - as it turned out they came out no problem, but the socket was very slightly loose on the bolts.
With these undone, the subframe should have just dropped off, but it stuck in place - I think it was just caught on the bolts on the bulkhead mounts, as a quick lever with a pry bar had it free in no time.
After all that messing about, the subframe was off!
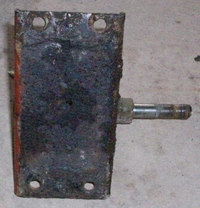
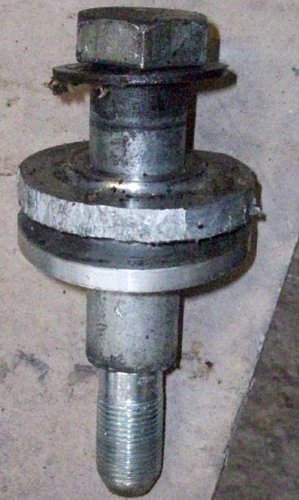 Upon Removing the Tower bolts, I was quite concerned at the state of the offside upper solid mount
(Mini Spares part# C-STR640)
(See left) - this appears to have corroded quite badly - to the point that I could actually prise sections off the
rough side with my fingers! As a result I will be replacing both sides solid mounts with new items when I
reassemble - I'm not happy that this has corroded to this state in less than 5 years, and given that the other
side seems OK, I'm assuming it's a defect!
Upon Removing the Tower bolts, I was quite concerned at the state of the offside upper solid mount
(Mini Spares part# C-STR640)
(See left) - this appears to have corroded quite badly - to the point that I could actually prise sections off the
rough side with my fingers! As a result I will be replacing both sides solid mounts with new items when I
reassemble - I'm not happy that this has corroded to this state in less than 5 years, and given that the other
side seems OK, I'm assuming it's a defect!
Given all the rot found so far, it isn't going to come as a surprise that I found yet more rust to contend with - I still had to strip everything off the bulkhead to make sure I found and dealt with all areas of corrosion - I really don't want any rust to come back if I can at all avoid it!
See the next page for removing the ancilliaries from the front end: