
I wanted to fit a rollcage, partially because Mini's aren't exactly renowned for their crash protection, but mainly
because I wanted to - although I want to use her for hillclimbs, I'm not really interested in taking it too
seriously, so don't need to fit one for the regulations - I'm only planning on entering as a novice.
 Having looked around at a few suppliers, I decided on the well known brand
Safety Devices
because they also did
Inertia Reel Harnesses
which are much better on a road car than regular harnesses, and they had a really wide choice of rollcage options
for the Mini. Although I originally intended to just buy simple rear and front hoops, I got a bit carried away and
went for the full on multipoint bolt in cage. It had to be bolt in, as at the time I was doing this I
had no welding experience or equipment.
Having looked around at a few suppliers, I decided on the well known brand
Safety Devices
because they also did
Inertia Reel Harnesses
which are much better on a road car than regular harnesses, and they had a really wide choice of rollcage options
for the Mini. Although I originally intended to just buy simple rear and front hoops, I got a bit carried away and
went for the full on multipoint bolt in cage. It had to be bolt in, as at the time I was doing this I
had no welding experience or equipment.
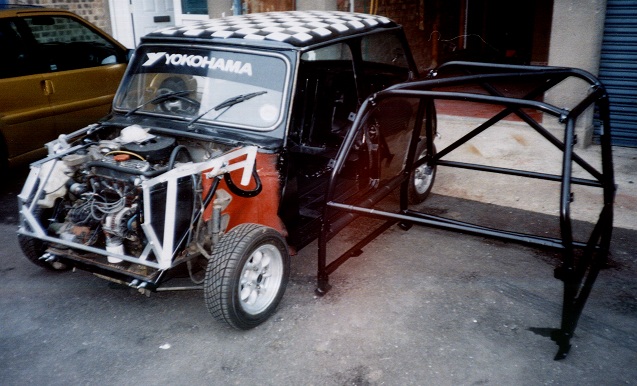
The first thing I decided to do was trial assemble the rollcage outside of the car, to make sure that everything was there, and give me an d=idea of how it all fitted together - much easier when it's not in the car!
With that done and it dissassembled again, the first step was to fit the rear section - due to the door bars and lower cross brace the rear door bins had to be removed - although I left the rear seat in place as I planned to use that for mounting the spare wheel to give more boot space.
 Normally when fitting the rear hoop it is difficult to get the lower feet past the B pillars - with a simple rear
hoop without cross bracing it's quite simple to use a
ratchet strap
to pull the lower legs togethere so that they'll fit past without scratching the paint - with all the bracing in the
rollcage I chose, this isn't possible. So my brother and I resorted to brute force, followed by some paint touchups
:-).
Normally when fitting the rear hoop it is difficult to get the lower feet past the B pillars - with a simple rear
hoop without cross bracing it's quite simple to use a
ratchet strap
to pull the lower legs togethere so that they'll fit past without scratching the paint - with all the bracing in the
rollcage I chose, this isn't possible. So my brother and I resorted to brute force, followed by some paint touchups
:-).
With the rear section in place, I lined it up and drilled off the bolt holes - Do not do this! As a result when I put the front it it didn't all fit exactly as it should, and I had to do a lot of arsing about to get everything to fit. A much better option would have beent to then dry fit all the other sections, line the cage up in the car and then drill off the bolt holes. Nevertheless, the rear cage looks pretty good (left).

With the rear section in place the next step was to fit the front section and door bars (the door bars help to locate the bottom of the front hoop, so bolting it in without the door bars in place would cause a lot of grief). I then drilled off and bolted in the front section (including the collars that secure the Door Bars and the dash cross brace), before fitting the bulkhead braces.
This was very tricky - as I'd already bolted everything else into position, I didn't have any space to play with for the bulkhead braces, and getting the offside brace in required a lot of messing about and a considerable amount of force. If I'd trial fitted the whole cage in the car before I drilled anything off it would have been much easier...
Still, it all went in in the end!


Having looked around at a few suppliers, I decided on the well known brand
Safety Devices
because they also did
Inertia Reel Harnesses
which are much better on a road car than regular harnesses, and they had a really wide choice of rollcage options
for the Mini. Although I originally intended to just buy simple rear and front hoops, I got a bit carried away and
went for the full on multipoint bolt in cage. It had to be bolt in, as at the time I was doing this I
had no welding experience or equipment.The first thing I decided to do was trial assemble the rollcage outside of the car, to make sure that everything was there, and give me an d=idea of how it all fitted together - much easier when it's not in the car!
With that done and it dissassembled again, the first step was to fit the rear section - due to the door bars and lower cross brace the rear door bins had to be removed - although I left the rear seat in place as I planned to use that for mounting the spare wheel to give more boot space.
Normally when fitting the rear hoop it is difficult to get the lower feet past the B pillars - with a simple rear
hoop without cross bracing it's quite simple to use a
ratchet strap
to pull the lower legs togethere so that they'll fit past without scratching the paint - with all the bracing in the
rollcage I chose, this isn't possible. So my brother and I resorted to brute force, followed by some paint touchups
:-).With the rear section in place, I lined it up and drilled off the bolt holes - Do not do this! As a result when I put the front it it didn't all fit exactly as it should, and I had to do a lot of arsing about to get everything to fit. A much better option would have beent to then dry fit all the other sections, line the cage up in the car and then drill off the bolt holes. Nevertheless, the rear cage looks pretty good (left).
With the rear section in place the next step was to fit the front section and door bars (the door bars help to locate the bottom of the front hoop, so bolting it in without the door bars in place would cause a lot of grief). I then drilled off and bolted in the front section (including the collars that secure the Door Bars and the dash cross brace), before fitting the bulkhead braces.
This was very tricky - as I'd already bolted everything else into position, I didn't have any space to play with for the bulkhead braces, and getting the offside brace in required a lot of messing about and a considerable amount of force. If I'd trial fitted the whole cage in the car before I drilled anything off it would have been much easier...
Still, it all went in in the end!